Category: Security

How to Enable SSH RSA Authentication On Cisco Device

If you have been around Cisco devices for a while you probably know how to enable them for SSH access and log in using a username/password. Yesterday however I ran into a situation while deploying Ansible where i needed to enable logging in to the router using an RSA key instead of a password and had to try few things to get it to work.

Why would you want to use RSA based user authentication for SSH instead of a password based authentication?

1- RSA keys are much more secure than passwords. Passwords (even when they are stronger than your dog’s name) are susceptible to brute-force attacks and can be compromised

2- Using RSA key is easier as you don’t have to enter or remember your password every time

3- You might need to use RSA authentication if you are using management or automation tools (such as Ansible) to manage the devices via SSH.

Here is what you need to do to enable SSH RSA authentication on a Cisco router:

Step 1: Enable the router for SSH server by entering the following commands:

ip domain name example.com

!

!generate the RSA key for SSH

crypto key generate rsa

!

username bob password 0 smith

!

line vty 0 98

 login local

At this point you should be able to SSH to the router using the username/password defined in the configs above. Fix any issues you may have before you move on to the next step. A good debug command to use for troubleshooting is: debug ip ssh  


Step 2: Enable Public/RSA Key Authentication

First make sure that you generate a public/private key pair on the machine you are trying to SSH from if you don’t already have one. SecureCRT and Putty for Windows have a built-in program to generate the key pair. If you are on a Mac or a Linux/Unix machine, you can use the command ssh-keygen to generate the key pair.

Next enter the following commands on the router:

R_Ent(config)#ip ssh pubkey-chain

R_Ent(conf-ssh-pubkey)#username bob

R_Ent(conf-ssh-pubkey-user)#key-string

R_Ent(conf-ssh-pubkey-data)#!ENTER YOUR PUBLIC KEY HERE

R_Ent(conf-ssh-pubkey-data)#exit

R_Ent(conf-ssh-pubkey-user)#end

 At this point you should be able to SSH to the router without entering a password:

MacBook-Pro$ ssh [email protected] -i MyPrivateKey

R_Ent#


Bonus:

If you need to allow only SSH and disable telnet and other type of access on the router, you can do so by entering:

line vty 0 98

 transport input ssh


Anas

Twitter: @anastarsha


Share This:
Facebooktwitterredditpinterestlinkedintumblrmail

Using Cisco CSR 1000v As Secure VPN Gateway To Extend Network To The Cloud

Cisco Services Cloud Router (CSR) 1000v is a virtual router you can deploy either in private/public cloud or in a virtualized data center.

One of the common use cases for the CSR 1000v is a secure VPN gateway in the cloud to terminate VPN tunnels. So if you run some applications in the cloud and you want to allow your branch offices to access those application over a secure network, you can run IPsec tunnels between those branch offices and the CSR 1000v in the cloud. From performance perspective this would work much better than back hauling the traffic to the data center (HQ) and then to the cloud.

In this post I will show you how to set up a VPN tunnel between Cisco CSR 1000v and a branch office router using Cisco Easy VPN. You may also use standard IPSec VPN but in my configurations I use Easy VPN because it’s, well, easier 🙂

The following configurations are part of a demo I gave at Cisco Live 2013 in Orlando where the CSR 1000v was the VPN server and the branch server (Cisco 2900 in this case) was the VPN client.

If you would like to learn how to install the CSR 1000v on Verizon Terremark eCloud, follow these steps in my post.

You will also need to open UDP port 500 and IP protocol ID 50 (ESP) on all firewalls sitting between the CSR 1000v and the branch router for the IPSec tunnel to be established successfully. Additionally depending on your design you may need to configure NAT.

In my setup, I’m using:

  • Cisco CSR 1000v with IOS XE 3.9x running in Verizon Terremark Enterprise Cloud
  • Cisco 2900 running IOS 153.2.T (branch office)

Here are the configs of the CSR 1000v (VPN Server). Only relevant configs are shown:

CSR-1#sh run
hostname CSR-1
!
aaa new-model
!
!
aaa authentication login hw-client-groupname local
aaa authorization network hw-client-groupname local
!
!
aaa session-id common
!
!
username myusername password 0 mypassword
!
!
crypto isakmp policy 1
encr 3des
authentication pre-share
group 2
crypto isakmp client configuration address-pool local dynpool
!
crypto isakmp client configuration group hw-client-groupname
key hw-client-password
dns 8.8.8.8
domain domain.com
pool dynpool
save-password
!
!
crypto ipsec transform-set transform-1 esp-3des esp-sha-hmac
mode tunnel
!
!
!
crypto dynamic-map dynmap 1
set transform-set transform-1
reverse-route
!
!
crypto map dynmap client authentication list hw-client-groupname
crypto map dynmap isakmp authorization list hw-client-groupname
crypto map dynmap client configuration address respond
crypto map dynmap 1 ipsec-isakmp dynamic dynmap
!
!
!
interface GigabitEthernet2
description WAN
ip address 10.22.36.71 255.255.255.224
negotiation auto
crypto map dynmap
!
interface GigabitEthernet3
description LAN
ip address 10.22.39.91 255.255.255.240
negotiation auto
!
ip local pool dynpool 192.168.1.1
!
!
ip access-list extended split_t
permit ip 10.22.39.0 0.0.0.255 any
!
end

Here are the configs for the Cisco 2900 router (VPN client).


no aaa new-model
!
ip cef
!
!
username vpntest password 0 vpntest
!
!
crypto ipsec client ezvpn hw-client
connect auto
group hw-client-groupname key hw-client-password
mode client
peer 10.22.36.71
username myusername password mypassword
xauth userid mode local
!
!
interface GigabitEthernet0/0
description WAN
ip address 10.35.120.104 255.255.255.0
duplex auto
speed auto
crypto ipsec client ezvpn hw-client
!
interface GigabitEthernet0/1
description LAN
ip address 172.16.4.102 255.255.255.0
duplex auto
speed auto
crypto ipsec client ezvpn hw-client inside
!
ip route 0.0.0.0 0.0.0.0 10.35.120.1
!
end 

Note: You can also install the CSR 1000v as a VM in VMware Fusion or Oracle VirtualBox if you want to play.


Share This:
Facebooktwitterredditpinterestlinkedintumblrmail

How to Secure Your Wireless Connection Using Sidestep and AWS

I have been looking for a way (other than VPN) to secure my internet connection when I’m working outside the office at Starbucks or attending a conference and using unsecure/open WiFi hotspot.

I stumbled upon Sidestep for Mac the other day and decided to give it a try. It has worked well so far and i really like it because it’s simple, lightweight, free, and best of all connects automatically if it detects I’m on unsecure wireless connection.

Sidestep uses SSL tunneling to connect to a proxy server (SSH server) and encrypts your data so that other people connected to the same network cannot intercept your unencrypted traffic. 

I first used a server I had at home as my proxy gateway but the speed was not so great especially when I was streaming videos and decided to set up a proxy server on Amazon Web Services (AWS) instead. That obviously solved my problem.

In this post I’m going to show how easy it’s to set up a proxy server on AWS and secure your open wireless connection:

  • Download and install Sidestep on your Mac
  • Head over to AWS and sign up for an account if you don’t already have one. If you are a new customer you can use their Free Usage Tier which gives you the services you need for this setup for a year. If you are existing customer and no longer eligible for their free tier, you would have to pay for the service but it is actually pretty cheap and you can shut down the instance when you are not using it to even save more.
  • Use the EC2 Launch Instance wizard and create an m3.medium Ubuntu instance. Make sure to allow SSH (TCP port 22) from Anywhere in your security group and download the public SSH key to your machine.
  • Once the instance is ready, click on it and copy the public DNS name from the bottom pane.
  • On your Mac, launch a terminal window, go to the folder where you stored the SSH key (cd <directory>)and execute the following command to make the SSH key readable only by you: chmod 400 <ssh_key.pem>
  • Now it’s time to test the connection and connect to the server. Launch Sidestep on your Mac and go to Preferences. From the General tab make sure there that Reroute automatically when insecure and Run Sidestep on login are both checked.
  • Click on the Proxy Server tab and enter your username (the default should be “ubuntu”) and the hostname (which is the DNS name of the instance) 
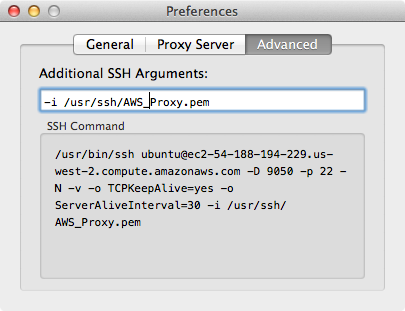
  • Click on the Advanced tab and in the Additional SSH Arguments field enter the following argument, this will tell Sidestep to use the SSH key and where to find it:  -i <path to your SSH key>/<SSH key>

    Sidestep AWS

  • Go back to the Proxy Server tab and click on Test Connection to Server. At this point your should see a “Connection succeeded!” message. 
  • Close the Preferences window now and click on Connect to get connected. If you open your browser now and search for “what is my IP”, your IP address will be the same as the EC2 instance IP address. From here Sidestep will automatically terminate the connection if you switch to a secure connection.

Note: if you decide to shut down your EC2 instance when you are not using it, please be aware that its public IP address and DNS name will be different after you turn it back on. That means you will need to update the hostname field in Sidestep every time you stop/start your instance. One way to work around that is to assign an Elastic IP (static) to your instance or install Linux dynamic update client on your Ubuntu.

Comment if you find this post useful.


Share This:
Facebooktwitterredditpinterestlinkedintumblrmail