Note: This post is obselete. There is easier way now to install the Cisco CSR 1000v on Verizon Cloud. This link describes how to quickly spin up an instance.
The Cisco Cloud Services Router (CSR) 1000v is Cisco’s first virtual router and it runs as a VM on x86 virtualized server. The CSR 1000v runs Cisco IOS XE and brings many benefits to a cloud environment where it can operate as a secure VPN gateway to terminate site-to-site IPSEC tunnels. Other use cases of the CSR 1000v include MPLS WAN termination and control & traffic redirection. You can find more information n this virtual router on the Cisco CSR 1000v page.
In this post I’m going to show you how to install the CSR 1000v on the Verizon Terremark eCloud. If you are not familiar with the Verizon Terremark cloud console, you can go here for some video tutorials.
Download A Free Trial Image
- Go to the Cisco Download Center and log in using your Cisco credential. Select the latest software release from the left pane and then download the .iso package from the right pane to your desktop. Don’t download the OVA or BIN packages. This free trial should be good up to 6 months.
![]()
- You can purchase a license from Cisco and upgrade to a full version after you install the CSR.
Create the VM
- Go over to the Verizon Terremark Enterprise Cloud (eClould) page and log in using your credential.
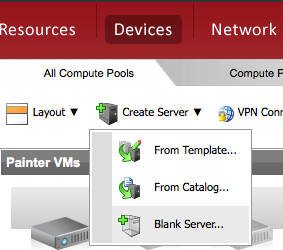
- The first step here is to create a blank server. A blank server is just a container inside the VMware environment that will hold the Cisco IOS later. So go to Devices -> Create Server -> Blank Server to launch the wizard.

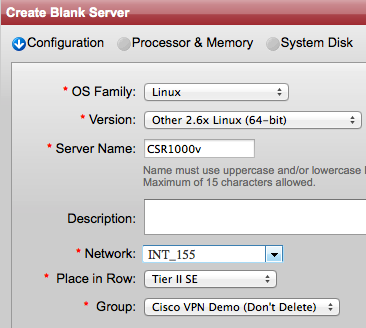
- On the next screen select Linux for the OS Family, Other 2.6x Linux (64-bit) for the Version. Give the server a name and a description (optional). Then choose an INT network and choose in which Row and Group you want to place the router.
- On the next screen choose 4 or more for the Processors and 4096 MB or more for Memory.
- On the next screen enter 8 for the Disk size or choose a Detached Disk that’s at least 8GB. Click Next.
- From the next window you can optionally assign tags or just click Next if you don’t want any tag.
- On the next window review your configurations, check the Agreement box, and click Deploy. Give it about 2 minutes and the server should be ready. If you go to the row and group where you placed the router you should see a greyed out icon (powered off) there.
- If you recall we attached only one network to the server earlier, however the CSR requires a minimum of 3 interfaces to run so next we are going to create two additional networks and attach them to the blank server. Right click on the server and go to Configure to launch the wizard.
- On the next screen choose Configure the Server and click Next.
- On the next screen click on Network Settings from the top. At this point you should see only one INT network under the Current Connection. Click Add a Connection from the top right to add a new DMZ Network.
- Go click again on Add a Connection and this time choose an INT network (INT_XXX). Choose a unique INT network different from the one you have used when you created the blank server. Click Save.
Now the VM will take a minute or so to reconfigure itself.
- Once the wheel stops spinning and VM is ready, right click on it and go to Power On. Powering on this VM should take a minute or so and while the machine is powering on an icon with gear spinning is presented. The greyed out icon should turn into an icon with “blue light” once the server is completely powered on.
- Click on the VPN Connect link from the top of the page. This will install the Cisco AnyConnect Mobility Client on your machine if you don’t already have it and connect you via secure SSL VPN to eClould. If the browser prompts you to install any Java or ActiveX plugin during this step make sure to accept.
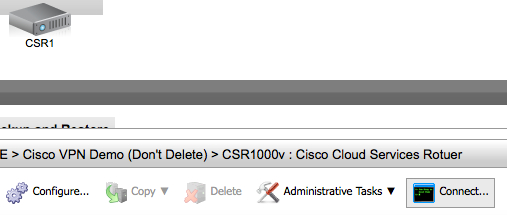
- Now click on the router icon and then click on Connect from the bottom pane. This will start installing the VMware remote console plugin if it’s not already installed on your machine and will connect you to the server console to install the CSR.
- By now you should see “Operating system not found” message on the console screen. Go to Devices-> CD/DVD drive -> Connect to Disk Image File ISO. This will open a new window for you to locate the ISO package.
- Select the ISO package from your local machine and click OK. The system will start uncompressing/unzipping the package and installing software. Depending on the file size and your network speed this process may take up to 2 or 3 hours. Come back in 3 hours to check on the install process. If the console session times out, reconnect again as you did previously.
- Once the CSR is successfully installed, you should see the traditional Cisco router prompt and you can then log in and start configuring it.
- First we need to find the CSR interface to vNIC mappings so go ahead and create the following table on a piece of paper. You will be populating its fields along the way:
NIC ID Network MAC CSR Interface IP/Mask Default Gateway 1 (eth0) INT 2 (eth1) DMZ 3 (eth2) INT
- Log in to the CSR console and issue the following command:
show platform software vnic-if interface-mapping
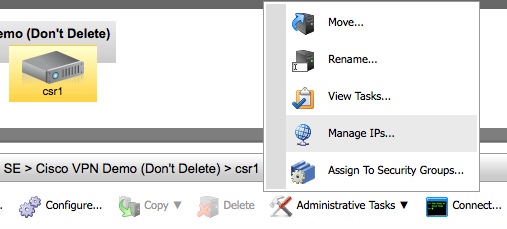
You should see three interfaces with their vNIC and MAC addresses mapping. If you are running IOS XE 3.10S or earlier the first interface from the top should be GigabitEthernet0 and it’s the management interface. On the other hand if you are running 3.11S or higher the first interface is usually GigabitEthernet1. Start populating the table you have created n the previous step with the information from the command you just executed (IP information will come in the next steps) . - Go back to the eClould portal, click on the router and go then to Administrative Tasks -> Manage PIs
- From the Networks section, click on the drop-down menu and select your DMZ network. Then from the left pane Available IPs select one IP address and click on the right green arrow to assign it to the server. Click Save.
- Repeat the previous step to assign IP addresses for the INT (internal) interfaces.
- Go back to the table and fill out the IP addresses, mask, gateway sections before you move on.
- Now that you have the IP addresses, masks, and interface mappings start configuring the DMZ and INT interfaces of the CSR by issuing the following commands for each interface:
config t
int gX
ip add <ip> <mask>
description <Outside or LAN interface>
- The final step here is to assign a default route so that the CSR can reach the internet. The CSR must use the DMZ default gateway to reach the internet because only the DMZ network can reach the internet because the INT networks are not visible from the outside. So copy from the table you have created the default gateway IP address for the DMZ network.
- Go back to the CSR console and issue the following commands. Make sure that you replace the text in italic with the IP address of the default gateway
- Try now pining the default gateway, you should get a response:
- At this point, the CSR should be able to reach the internet. Issue the following ping to make sure:
ping 8.8.8.8
If you don’t get a response then something is wrong and you should revisit the previous steps.
Share This:


Mostafa,
Absolutely. That’s the whole purpose of using the CSR. Just make sure that the default gateway of your VMs is set to be the CSR LAN IP. You may want to check this post where I explain how the CSR can be used as a secure gateway.
http://anastarsha.com/using-cisco-csr-1000v-as-secure-vpn-gateway-to-extend-network-to-the-cloud/
Great post.
I have one question: can you connect VMs behined CSR and use CSR as the default gateway to provide network services like Firewall?